|
 |
| This isn't necessarily the best or easiest way to produce a webcomic, but it is what works for me. Ready? Here we go. |
|
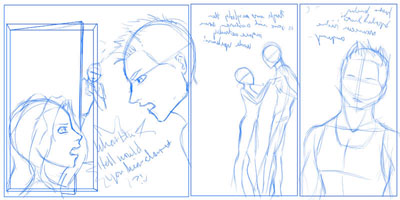
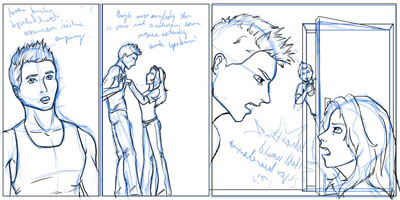
| I start off with a fairly large document in OpenCanvas, usually 1600x800px, at 200px/inch because this lets me draw big, and get in as many details as I possibly care
to. I use my Wacom Tablet to sketch out the basic shapes and rough out some layout with the rectangle tool. I prefer to draw in blue, green, or purple, because it's easier to see when I go back and
do my "inking." Fun fact, this image is backwards because I couldn't get Ayen's face to come out right, so I drew him backwards. |
 |
|
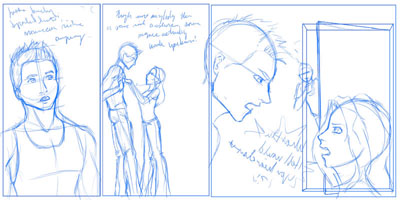
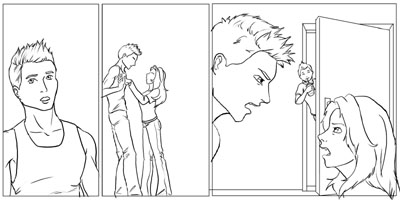
| Second, I go back and add some details. Sometimes this step happens, sometimes it doesn't. Here I finished out Ayen's face and added in details on their
clothes. |
 |
|
| Here's what I really love about working directly onto the computer. To do the inking, I create a completely new layer. In OC, this new layer is
transparent, so that only the marks that I put on it show up. Everything else underneath shows through. If you're not familiar with layers, it's sort of like tracing a sketch onto a transparency. I
prefer OC because the lines are a lot smoother, and the edges of the brush tools are a lot cleaner. There's not a lot of fuzzy grey that you get around the edges of Photoshop brushes. |
 |
|
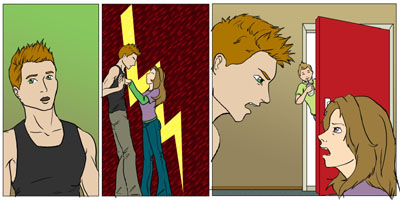
| I do my coloring in Photoshop, because the tools are a little more intuitive for me. When I open it up in Photoshop, I just clear out my sketch layer,
leaving me with a white background, and my nice clean lines, on their very own layer. Pretty, no? |
 |
|
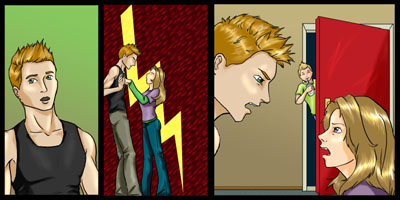
Here's where we play lazy artist. I use everyone's favorite, magic wand tool, and select inside whatever areas I want to color. I usually start with skin
tones. I select all of one kind of skin tone. Here's the sneaky part. I create a new layer between my background and the outlines, and use that to do my coloring. Here's the other sneaky part. When I
have my space all selected (all the spots of Ayen's skin for example) I use the Select>Modify>Expand option, so that my selected area actually overlaps the outlines by one pixel. Then I
go to my color layer (keeping my selection) and fill, using paintbucket. Voila! Because the color layer is underneath the outlines, the area is nice and filled, and all I have to do is touch up any
little white spots that didn't quite make it. Lots faster and neater than coloring by hand. I also usually play with gradient and pattern fills, depending how lazy I was about drawing the
background. |
 |
|
| Next exciting step. I create another totally new layer, between "Color" and "Outline" and set the layer mode to Multiply. Again, I use the magic wand tool,
only this time I set it so that it's not contiguous, meaning it will select all of a given tone in a particular layer. On the Color layer, I select whatever I want to shade, and then move to the
Multiply layer. Using the same color I used to fill in the area, I draw in my shadows. Because the whole layer is set to multiply, the shadows will show up as a darker shade of the same tone.
Cool huh? Ah know. Lahk sehriusly. Then I go back to my "Color" layer, and use the Dodge tool to lighten up some highlights. Yaay depth! |
 |
|
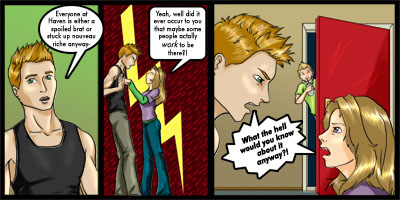
| The final comic, I reduce the resolution to 100px/inch, and it shrinks the whole thing down to 800x400, which is what you see. The last step is filling in the text. Again, totally new layer. I type in all my text and position it. Then, I make white ovals or boxes using a Select
Shape tool. I fill them in, and stroke the whole layer to 2px of black. Ta da! |
 |
|